Note from Nektar: This is a placeholder tek to link from some popular "everything" teks here. This one will work until SmellyHobbit and I finish the fresh new current one we're working on.
This is the best tutorial on the topic on this site, but there was one very wrong part in the middle (about finding "sectors" and "monocultures") which is not needed and a lot of new growers have wasted countless hours on it. More in first comment here). I tried to get a hold of Stro, but hasn't logged in here since 2018. So I posted his tek here and edited out the wrong parts.
Note from BeefSupremeJr: "To my readers: Please forgive me if you were one of these people who was working with the original version of Stro's writeup (that I linked) and obsessing over working towards a monoculture.
"Ill be honest here, I was, and wasn't aware that this information wasn't accurate when I published The Hitchhiker's Guide To The Shroomery. My sincere apologies. Thank you Nektar for clearing this up and for putting in the extra work to revise our knowledge base. Bless you."
-----------------
Nektar note: I replace his recommendation of an alcohol lamp with a butane brazing torch. Amazon has them. It gets the scalpel red hot much quicker than an alcohol lamp. And don't use any flame inside an SAB where you've had alcohol. Flame scalpel outside the SAB, then move it into the SAB. Use your head, I am not responsible for fires.
If you have a plate you're not sure of, post a clear pic on the Agar Envy thread and ask.
----
Stropharis said:
Stro's Cleaning and Isolating On Agar
I recommend putting all your spores and clones on agar first, by doing so, you can ensure that you are working with a clean culture before you introduce it to grains, and it will also take out the guess work of spore viability.
So once you have a culture growing on agar, you will now want to make sure that it is clean and free of contaminates. How do you get there? Well for starters you need a few things, pictured below is the majority of them.

You will need a Still Air Box to do this, if you do not have one, it is a very easy build using
Stro's Still Air Box. Ideally though, given that you have sufficient time and/or money, I recommend building a laminar flow hood. However, their will still be circumstances that make a still air box the more suitable choice. If you are going to build one,
Stro’sFlowhood Build may be of use to you, building it was a very rewarding process. If you do decide to use it as a reference, please share your progress with me.
Some other items needed include paper towels, isopropyl alcohol, lighter, alcohol lamp or similar, gloves, scalpel, new dishes, and parafilm or cling wrap, and your cultures of course.
To demonstrate how I clean up my cultures when they need it, I will be using a few clone cultures that I took using different levels of care so they would have different levels of contamination for the purpose of this write up. A, B, and C.
A

B

C

I don't think I have to tell you what clone was taken carelessly, the photos speak for themselves.
When taking A, I swung my un sterilized scalpel like a battle axe dismembering the pin and watched it fall onto the substrate below, then I stabbed it while doing my best Braveheart scream and preceded to gently place it on the plate. I figured this was a fairly un-climactic ending so I shook the dish and watched the nasty little pin roll around contaminating the entire medium surface.
You would ideally want to do a transfer from a dish as soon as you see growth to avoid spreading any contaminants during the transfers. The less there is growing on your dish before the transfer the better.
So now we need to clean these up right? In order to do that, we will be transferring contaminant free, healthy mycelium growth to a fresh plate. Lets use A for an example, on a culture this nasty you might want to look at it and decide where you will be taking your transfer from before you are working inside you SAB, you will be working with a limited view.
Taking another look at A; there are limited options. Using a clock position, as people often use discussing where to transfer, the best option I see here is at about 4:30 but even this area is pretty close to bacteria which I have circled in red. Care must be taken to avoid those areas so we can do this in one transfer. In addition, it is a good idea to get a good look from the back as well, sometimes bacteria can be underneath the mycelium and then you would be transferring contaminant laden mycelium. The green area is that actual wedge that I transferred from this plate to a new one.

In B you can see that there is only a small culture of bacteria that is by coincident also at the 4:30 and that all other area are suitable for transfer.

And C, does it even need a transfer? No it doesn't, you can see it is already clean culture and was ready for grains as is.

So lets cover the transfer now;
First the working surface is wiped down with lysol and an air sanitizer sprayed into the air, and all necessary equipment wiped down with isopropyl alcohol and placed in an appropriate location relative to your work area. The bag of fresh plates was brought inside my SAB, opened, removed plates, closed, then removed from SAB. I don't normally do this but I did it to provide for more room and to facilitate this write up.
Here you can see I am just about ready to go.

All the wrap is removed from the dishes and they are set up. The dishes closest to me are ready for transfer and the ones furthest are "on deck".
Sterilize your scalpel over your alcohol flame (outside your SAB of course) and the bring it inside. Open your new dish and cool the blade on the outer perimeter of your agar. If you look, you will notice these marks on a lot of the dishes you see photos of. Here it is highlighted in blue. The mark from cooling the scalpel.

I will let the photos do most of the talking for the transfer.


A few things to note here is that my new dish is on my left side, I do this because I do not want to be reaching over it for any reason. I am right handed and will be using my right hand to do the transfers; if you were left-handed you would want to reverse this. I also do my best to have the clock position that I want easily accessible so I am not spending any more time than necessary with top off. When I transfer it to the new dish, I do my best to only reach over the agar with the scalpel and to not have my hand over the dish at any point. Normally I would complete all transfers before I wrap and mark my dishes but for the purpose of this write up, I then wrapped the new dish.

I honestly don't need to isolate C any further, it is going to produce and perform well and in fact there is a possibly that isolating it further can be counter productive. I actually only took one transfer from this culture as previously discussed as I currently can't facilitate very many projects at the moment.
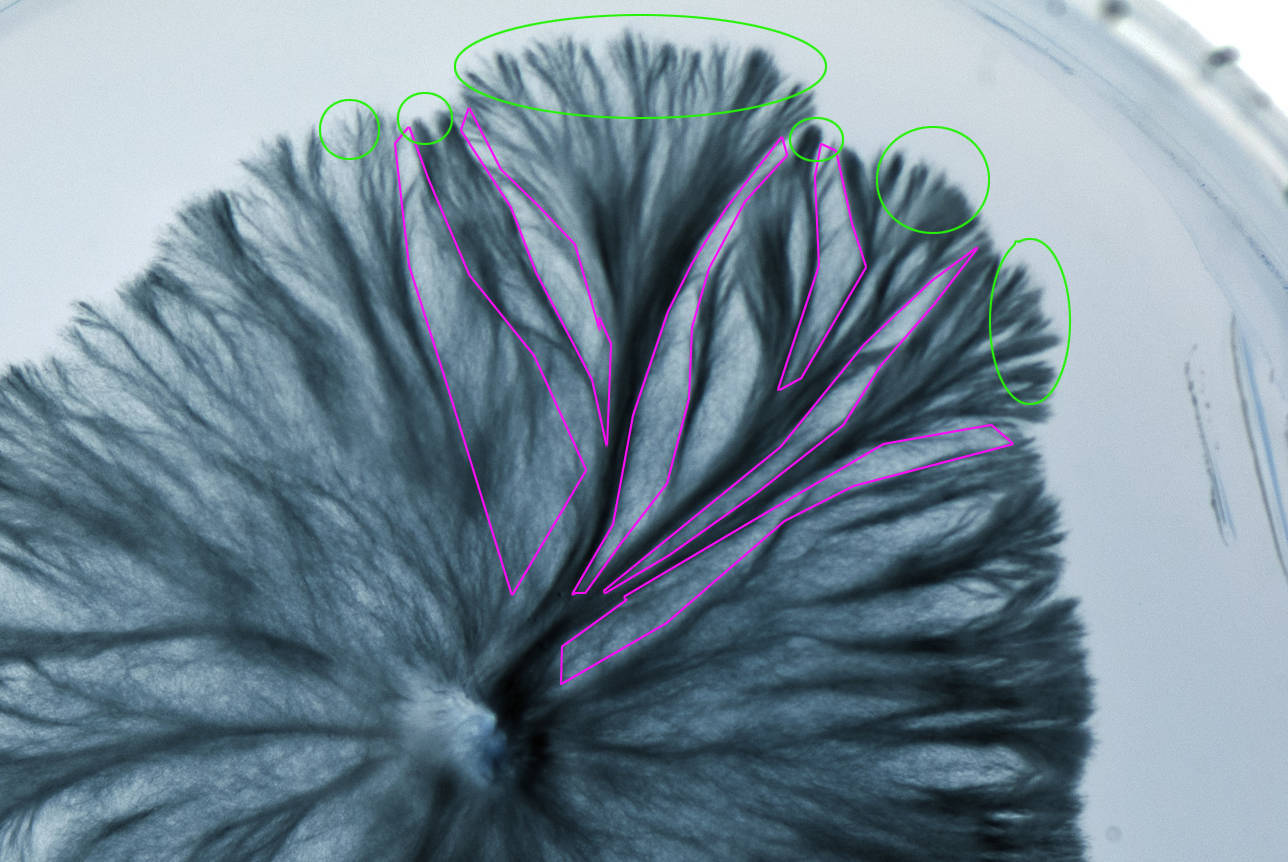
Moving on....you can see the fan like colonies spreading themselves out and growing at different rates and with different characteristics, sometimes separated with less dense areas refereed to as "lines of isolation".

At a closer look though, there are more than that. For an example I will use only the 11:00 to 2:00 on the same image only cropped and inverted so I don't sit here all night drawing lines.

Another point I would like to make while I am in the process here. Some things outside genetics can have an effect on the characteristic of your culture, whether it be rhizomorphic (strandy) and tomentose (cottony). Things like the nutritional value of your growth medium and temperature. These plates were transferred to a different batch of agar although the measurements and method of preparation were kept the same; using
Sto's Agar Prep500ml distilled water (1/2 liter)
10g Agar-Agar
10g Malt Extract
The most important thing here is we now have three clone cultures that are clean and nearly ready for grains.
Updated with a few photos, to keep things simple I will reorganize.
Original clone cultures

Seven days after
first transfer from clone culture


Eleven days after
first transfer from clone culture


As you can see the cultures are looking healthy, so C is a better place to transfer from
As a learning tool, I will go over one or two things here. When I first posted the photo that were taken seven days after transfer someone was asking me a few questions and I said;
What made me come to the conclusion that C was better to transfer from? Again it was primarily the outer parameter of the culture, although it was young and tomentose, take a look at the 12 o'Clock and you will see a very small section with different behavior than the rest of the uniform culture.
Now just four days later, after it has matured quite a bit and has also developed rhizomorphic hyphea, you can see the contrast in uniformity between the part at 12 o'Clock, it has fanned out and distinguished itself even greater. I was happy to see C look so clean and that part on A distinguish itself so much after saying that.
- Stro
--
2025 Note from Nektar: In addition to the above, I'd recommend people look at
this great thread from Tmethyl on how shroom growing should and shouldn't look, at every step, including agar plates. That way, you can better recognize contam so you can take your transfers from another part of the plate. There are many plates there from many people, so it covers a wider range of possibles.
Since teks here improve a lot over time, I recommend in general that people don't use teks older than 5 years. But that thread is an exception.


 Threaded
 Previous
 Index
Index Next
Next


 nektar61




 Edit
Edit  Reply
Reply 




 Stropharis
 l33tmouse
 Oatman2000
 Simisu
 1 2 all )
 lIllIIIllIlIIlIlIIllIllIIl