Liquid Spawning or Inoculant 2015:
FIRST OF ALL, WHAT IS A SLURRY?
A slurry is a method of using a pf cake or a colonized quart grain jar to blend as a liquid inoculant for grain jars or bulk substrates. It is hands down the fastest method to colonize quart jars for bulk substrate spawning. The potential and speed is matched by no other method.
WHAT IS A LIQUID INOCULANT?
A liquid inoculant(LI) uses sterile water to expand mycelia exponentially at a fast rate. A liquid inoculant does not have extra nutrients added such as sugars or agar as a Liquid culture does. With a Liquid inoculant, you take a colonized piece of mycelia on an agar plate, a grain quart jar or a pf jar and blend it up with sterile water using an eberbach or an oster blender attachment to expand that mycelia onto media.
BENEFITS OF A LIQUID INOCULANT
A liquid inoculant allows speed, timing and vigorous growth for a perfect cycle. It saves time, effort and work. A liquid inoculant allows the cultivator to fruit and spawn when it is convenient. You do not become a slave to your mushrooms. An LI also allows one to expand a small amount of culture into a very large amount of culture in a timely manner. Where one might wait 10-14 days for a G2G(Grain to Grain Transfer) or up to 14 days for an agar wedge to colonize grain, a Liquid inoculant can colonize jars and substrates in less than a week. The beauty is that you can take a clone from stem tissue in a liquid inoculant and fruit it in 20 days give or take a day or two on different variables like temperature.
Quote:
9er tek clone>pf jars>slurry>spawn run>fruit
4 days pf jar clone
3 days grain colonization
3 days bulk sub colonization
7 days to fruit
3 days to harvest
DOWNSIDE OF LIQUID INOCULANT
The downside of a liquid inoculant is that if your not working with a clean culture, then you may be spreading contamination at an exponential rate. Prior to attempting this, take all necessary measures to educate yourself on how to prepare a clean culture.
TV CASUALTY'S SLURRY IN A HURRY TEK
TV Casualty is the man who invented this method. This has revolutionized mushroom cultivation and everyone needs to know that you can successfully have fully colonized quart jars or bulk substrates in 3 days. And I mean enough for more than 20 Tubs worth of spawn from 1 pf cake in less than 7 days you will be ready to spawn your tubs. In addition, there are several different types of slurries that I have experimented with over the course of the last 6 years. Initially this was made to inoculate grain spawn and colonize it as fast as you can. Now, it has progressed to Slurry spawning grain jars directly to substrates. Using slurries in your bulk substrates you will see that it takes about 13 days on average from bulk substrate spawning to harvest.
TV Casualty's Slurry In a Hurry Tek
FEAR OF LIQUID CULTURES OR LIQUID INOCULANTS
All this fear needs to be put to rest. Liquid cultures and inoculants have been used successfully long before I registered on this forum. In addition only recently in the past few years everyone has been extremely fearful and it has caused quite a loss on experimentation for the sake of discovery. I assure you if your culture is clean and you slurry using clean and sterile technique you can have great success in a Shmuvbox, SAB or in front of a flow hood. Additionally, you can have multiple flushes without contamination. I will illustrate this over and over below.
WARNING FOR USING THIS TEK: NOT FOR NEWBIES
This tek is more of a step 4 process after you have learned some of the basic principles of mushroom cultivation. I suggest using it after you have mastered some of the principles below first.
1. learn basic sterile/clean principles
2. get a few tub grows in or have a grasp on growing and the entire mushroom cycle even if in pf jars or bag grows.
3. learn the basics of properly preparing grains using clean cultures. be able to successfully use grain spawn and grow out substrates with multiple flushes. have a grasp on bulk substrate and moisture content.
4. try liquid inoculants/ slurries when you have the first few principles down.
3 TYPES OF SLURRIES _____________________________
SLURRY TYPE 1:PSG(Pf jar slurried to grain jars)pf jar blended and poured into grain jars)
Results: 3 Days to colonize quart jars. Tv Casualty's results
   
My results: Day 1, Day 2, 77 hours, 82 Hours, 89 hours, 101 hours, later with a very weaker than normal slurry.
       
This is a comparison shot of the 10 day old P2G(PF to grain transfer) method side by side with the 4 day old slurry jars. The p2g has the red mag lite next to it.

Spawn Bag made with the same F+ slurry batch after 82 hours(2pics), 89 hours, 101 hours.
   
1 PF half pint jar used to inoculate 30 Quarts
    
  
tombosley8 results:
  
Friend's Spawn Bag Results; Day 3-5
  
Bag Spawn after 3 days:

7 TUB GROW DONE WITH GRAIN PREPARED BY PF SLURRY. 1 PF JAR SLURRIED TO 40 QUARTS
eatyualive said:
Ok final 7 tub updated. All 4 cased tubs fruited from spawn to fruit in 12 days. All uncased tubs fruited from spawn to fruit in 13 days. The casings were very thing for this test run at 1/4-1/2" which were substrates used as casing like fahtsters method. ill keep posting results and show everyone that this is consistent, repeatable and it works just fine with minimum contams if you follow proper clean and sterile procedures.
BELOW IS A 7 TUB GROW OF CASED AND UNCASED SUBSTRATES THAT WERE SPAWNED WITH WBS GRAIN SPAWN PREPARED FROM A 1 PF CLONE JAR SLURRY
CASED TUBS 12 DAYS SPAWN TO HARVEST
1ST FLUSH
   
   
2ND FLUSH
      
        
3RD FLUSH:
         
UNCASED TUBS 13 DAYS SPAWN TO HARVEST
1ST FLUSH
  
  
2ND FLUSH:
   
PROCEDURE FOR JAR INOCULANT
Materials:
- small mouth pint jar
- band for the small mouth jar
- foil
- oster blender base and blade assembly
- pressure cooked butter knife wrapped in foil
- black plastic base for the blender attachment
- one colonized 1/2 pint pf jar
- as many colonized grain jars as you want up to 100: wbs, rye berry, popcorn
- optional: you can also use this on grain prepared in filter patch bags
- pressure cooked foil large enough to set a pf cake on. this is wrapped in foil
Reasoning:
Usually this method works well when you have about 20-100 quart jars you want to colonize in 3 days. If you are only doing 10 quart jars then you wouldn't need to use about 90% of the slurry because you only need a small amount per jar. I will then use another method like P2G for fewer jars. However, if your using a smaller quart jar number you can easily add less water to the mix and make the slurry more muddy. This will reduce the risk of adding too much water to each jar. You only need a small amount per jar. I would compare this to the equivalent of about a tablespoon of slurry per jar. You also need to be careful that if you add too little of water, the cake won't properly blend in the jar. I would say 1/3 to one half of the pint jar is a good ratio. 1/3 on the muddy side, 1/2 on the more liquid side with more jars.
Procedure:
1. Prepare your utensils in the pressure cooker. I wrap a piece of foil large enough for me to flip a pf cake upside down on and cut it in half. I then wrap that piece of foil with foil and pressure cook it with other utensils.
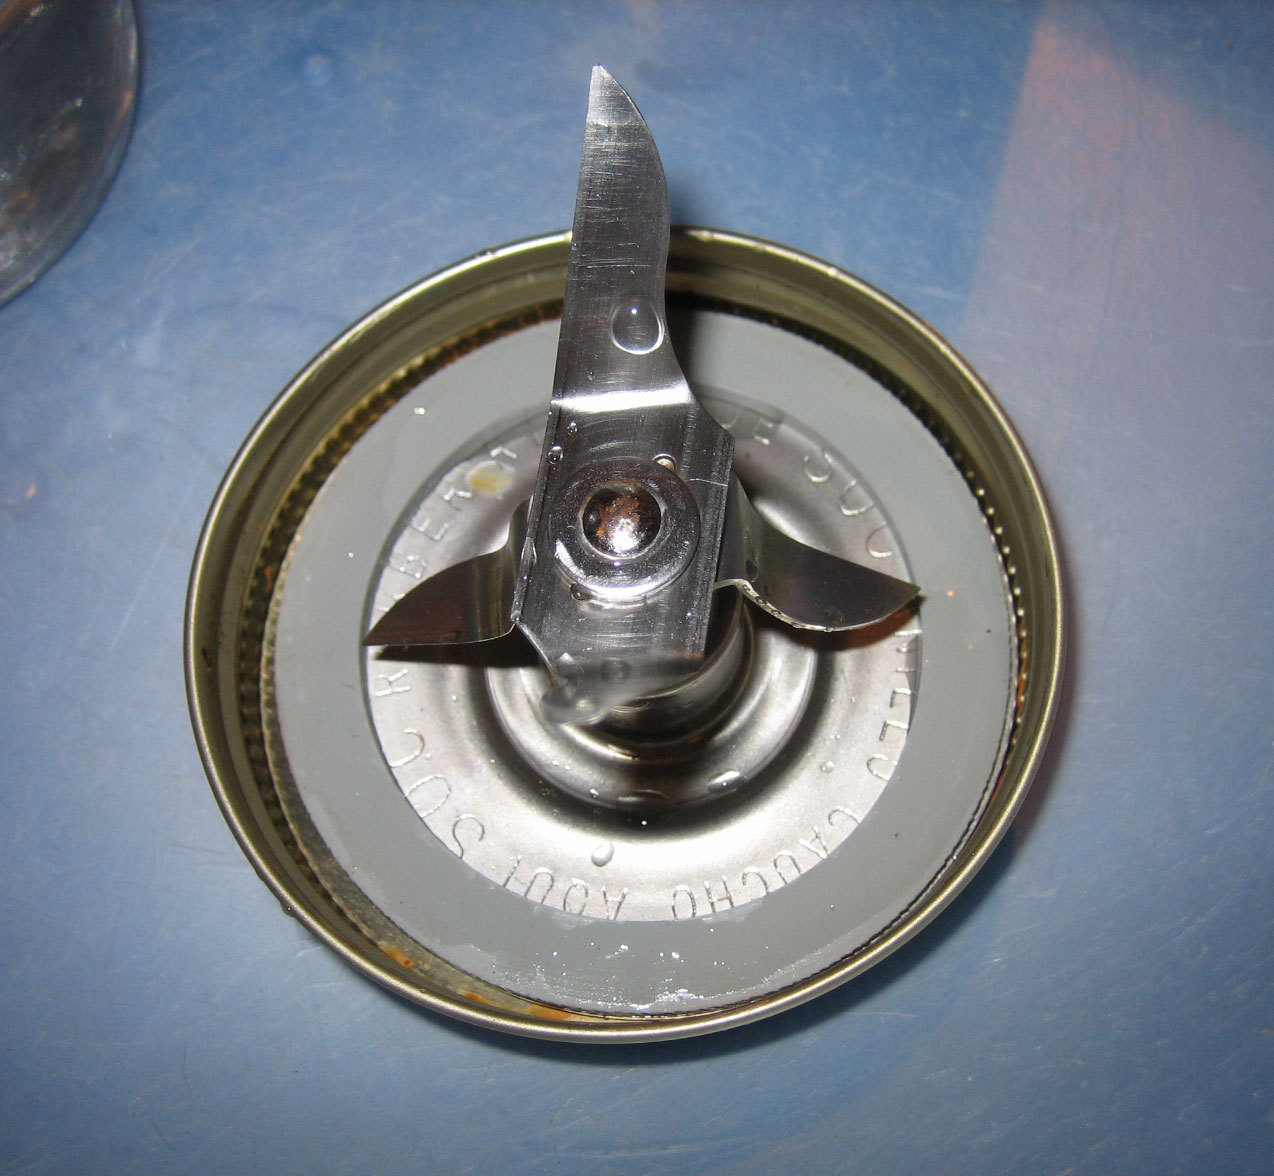
2. As you can see the small mouth pint fits snugly to the bottom of the blade assembly. Fill the pint jar halfway with distilled water and place the blade assembly and ring on top of the assembly. Twist the ring so it is tighter but not too tight. Then place foil over that. Now it is ready for the pressure cooker. Some people have issues with the plastic grey gasket that hangs on the blade assembly. Mine is so old that it pretty much sticks to the blade assembly and i don't have to worry. However, you can also RTV silicone this directly to the lid in order to make things easier. You want to make sure that the bottom part that is touching the jar is not siliconed. Only silicone the top to the blade assembly.
   
 
TRIBAL CONTAINER BY CARCASE-X
This is now the preferred build for all your slurry and grain slurry pours. It makes things easier and cleaner.
TRIBAL CONTAINER

3. Place your butter knife wrapped in foil along with your other utensils(pint jar with assembly) in the pressure cooker. Pressure cook for 30 minutes at 15psi. Let it cool. Then you can begin doing the clean work to do the liquid transfer.
4. Now that you have all your utensils sterilized and your grain jars prepared. It is now time to setup your clean work area. In my case I use a
Shmuvbox or you can use a floowhood or SAB. I setup all my jars to the far right out of the way so I have room to place all my utensils up front in the shmuv. This is so I can easily reach the utensils. I wiped all the jars down with rubbing alcohol prior to sticking them inside the clean work area. You can see my foil wrapped foil in the middle, my foil wrapped butter knife in the middle and the fully colonized pf half pint on the right. You will also notice the black assembly that attaches to the blade assembly for the base of the oster blender. I wiped this down with a bleach wipe prior to putting it in the shmuv.

5. You also want to setup your blender close by. I wipe the whole thing down from top to bottom with bleach wipes and even spray it with lysol.

6. Now you can prepare everything to ensure a quick transfer. This process involves taking off the foil and band lids to the pint jar or jars. You will also take the lid and foil off of your colonized pf jar. I place the items to the side out of my working area. But you can also take them out of the shmuv completely. Although if you remove your hands, always clean them thoroughly before placing them back in.

7. Now I am about to dump the pf cake upside down on my sterile foil.

8. Unwrap your butter knife and cut the pf cake in half. Now I am doing this because im trying a less slurry or muddy mix to see if it still works. You can simply use one pf cake and dump it upside down into the pint jar. This is a technique view of the 1/2 pint jar flipped upside down on the pint jar so that the cake slides right into the jar without touching anything. If you have to move the blade assembly be sure to set it face up not touching anything on the blade. You can hold it in your hand and flip the jar at the same time but you need to be careful not to touch it on anything. You don't want to introduce any contaminants into the jar.
 
9. Now if your using one pf cake for less jars. Simply flip the jar upside down shown in the previous step. Or if your making multiple jars for liquid spawn or liquid inoculant you can use your sterile knife to cut the pf cake in half. You have placed this pf cake on the sterile foil which you just unfolded. Work clean and fast. You then spear the side of the cake with the knife, open up the blade assembly touching only the outside and place the cake into the jar. You can position the cake so that you can simply use the cake edge against the inside edge of the jar to use as leverage to pull the knife out and the cake will drop right in. This takes about 3 seconds max.
 
10. Now I place my black blender attachment assembly on the top of the metal blade assembly. I clean the area so that when I am about to do the transfers, there is clear room to work clean and fast.
 
11. I now take the jar and assembly out of the shmuvbox but still in my cleaned work area and use the blender to blend the cake into slurry.
  
12. Now the slurry is ready to pour into each Jar or bag.
13. You simply bring your jar back into your work area. You have all your quart jars and bags with loose lids ready for transfer.
14. With one hand slightly lift up the blade assembly lid with your fore finger and you will then open the quart jar lid with your right hand. You pour about 1 tablespoon of slurry into each jar. The key is to quickly close both lids simultaneously after you do the quick transfer. This minimizes contamination.
15. After you have inoculated all of your jars and bags. You simply shake the jars for 20 seconds each. You want to distribute that extra water you poured into your grain jars as much as possible so that you don't have any issues after this. At first you will get a little scared because your jars will look like there is pooling water at the bottom once they have sat on the shelf a few hours. Be patient, wait it out. The idea is to have fully colonized jars in 3 days without a shake and it works.
FOR THE SLURRY IN A HURRY TEK DO NOT SHAKE THE JARS. THE KEY HERE IS TO HAVE FULLY COLONIZED JARS/BAG SPAWN IN 3 DAYS WITHOUT SHAKING THE JARS AT ALL.!!!!
SLURRY TYPE 2:
GS2G Transfer(Grain Slurry to Grain jar transfer): wbs grain jar blended and poured into other grain jars.
A ratio of 1 pint grain spawn to 1/2 pint of water was used for 50 quarts of colonized grain.
Do all of this as sterile as possible. Research on sterile technique is assumed prior to this.
1. Fill a pint jar half full of distilled water and place the blade assembly on it. Pressure cook for 20 mins at 15psi. Allow jar to cool.
2. Prepare your clean area(Shmuvbox, SAB, Flowhood) and your substrates and tubs. Setup for spawning.
3. Using a phonebook, break up the grain inside the jar.
4. In your SAB, Take the colonized pint of grain loosen the lid. Loosen the lid of the sterile water pint jar.
5. pour water from water pint into grain pint.
6. place blade assembly lid on grain pint and water pint jar.
7. Blend on your oster blender base. Hold the jar in place with your hand while blending. I blend about 30 seconds.
8. In your SAB, Pour the grain slurry into your quarts jars. You pour by eye about 1 tablespoon volume of slurry per Quart Grain Jar.
9. Wait 3-4 days until full colonization. Give it a day or two more and then your ready to spawn your tubs. You can shake your grain a day before spawning to test for any contamination.
Regular Mouth Lids
 
Quarts and Pints(Pints will each be used as masters to slurry 100 more quarts each. In the last picture you can see all the colonized pints and 1 quart that i slurried. all the colonized jars are on the last bottom picture. each one of those pints will be used as a master for more than 30 jars at a time)judging from experience, each pint can do at least 200 quart jars of grain. i easily did 30 tonight and had to throw out 2/3rds of the pint jar of grain leftover.
   
SLURRY TYPE 3:
COLONIZED WBS QUART SLURRIED DIRECTLY TO A SUBSTRATE
This trial run was 2 colonized Wild Bird Seed jars from the clone shown below that were blended, poured and mixed into the substrate.
Quote:
THAI LIPA YAI: WBS 2 QUART GRAIN SLURRY TRIAL #1:
UNCASED SUBSTRATE
THAI LIPA YAI (TESTED CLONE UNCASED):
TUB 1 YIELD: TOTAL 450g 17.9 oz
1st: 240 grams 8.5 oz
2nd: 70 grams 2.5oz
3rd: 59g 2oz
4th: 81g 2.9oz

Substrate Ratio Per Tub:
1:4.5 Ratio Spawn:substrate
- 2 Quarts of WBS grain slurry spawn
- 9 Quarts Volume: 3/4 Brick Coir/ 1 Quarts Verm/ 1 cups gypsum
- 1.5" Sub Depth
TUB 1 YIELD: TOTAL 128 g 4.5 oz
1st: 73g
2nd: 32g
3rd: 23g
13 days from spawn to harvest
  ] ]  
2nd Flush:

3rd Flush:
   
FULL PROCEDURE:
GRAIN WAS PREPPED USING FOOMAN'S GRAIN TEK IN 2 HOURS
MADE 40 QUARTS WBS GRAIN JARS FROM 1 PF JAR SLURRY (THAI CLONE FOR A TEST RUN BELOW)

MIXED UP 1 SMALL BRICKS COIR, 2 QUARTS VERM, 1 CUP GYPSUM, 5 QUARTS WATER. EXPANDED THE COIR WITH HOT WATER

DUMPED IN THE DRY VERM AND MIXED IT ALL UP WITH THE COIR. THEN POURED THE GYPSUM THAT WAS MIXED IN WITH 4 CUPS OF THE WARM WATER ON TOP OF THE VERM COIR MIX. THEN MIXED IT ALL UP.

PUT IT IN TURKEY TINS IN THE OVEN FOR 2.5 HOURS. INNER CORE TEMP WAS BROUGHT TO 170 THEN SET FOR 2 HOURS AT THAT TEMP.

ONCE COOL, FLIPPED THE TURKEY TIN UPSIDE DOWN IN MY PRE LINED TUB.
I TOOK A WIDE MOUTH QUART JAR THAT I RETROFITTED A BLADE ASSEMBLY TO THE LID. I PRESSURE COOKED 3/4 QUART OF WATER AND THE BLADE ASSEMBLY. ONCE COOL, I USED A SHMUVBOX FOR CLEAN WORK AND TOOK THE LID OFF 1 COLONIZED QUART. I POURED HALF OF THE 3/4TH QUART OF WATER INTO THAT COLONIZED QUART AND QUICKLY PUT THE METAL BLADE ON IT. I THEN USED A DRILL BIT ON THE END OF THE BLENDER TO BLEND UP THE JAR. I THEN DID THE SAME THING ON THE 2ND COLONIZED QUART OF GRAIN. I POURED THE REST OF THE WATER INTO THE 2ND QUART, THEN PUT THE SAME LID ON THE 2ND QUART JAR. THEN BLENDED IT WITH THE DRILL BIT. I POURED IT ALL INTO THE SUBSTRATE AND MIXED IT IN THOROUGHLY WITH THE PASTEURIZED SUBSTRATE WITH GLOVES ON.(I DIDN'T TAKE PICS SO IM SUBSTITUTING SOME I HAVE THAT ILLUSTRATE THIS)
BLEND WASN'T QUITE THIS SOUPY BUT DID LOOK SOMEWHAT LIKE THIS.
 
THE QUART LID IS LIKE THIS.
  
    
NOTES:
Dry yield wasn't anything special just normal. 73 grams. the substrate depth was only about 1.5" thick with no casing. 13 days from spawn to harvest. 23 days from clone to fruit. lighting speed! dunked for a 2nd flush. I plan on attempting this with a 5 tub uncased and 5 tub cased test next to get a wider range of results. The speed goal was met, yield was fair and the grow was extremely easy. I need to do some grow room tweaks to get it dialed in properly. But other than that I plan to try this same 2 Quart slurry with a 3" sub depth and cased tubs. This was an extremely fun experiment. I plan to take it to the next level in the next few months. I'm fairly confident this is repeatable and will get past 3 flushes. I am also confident that the contam ratio won't be any different than any other method I have used. I'd put my money on it. The only obstervation that I believe would cause an issue is if you use larger size grain like Rye berry or Oats. The size of the inner uncolonized grain ends up being too much exposure for contams to set in unless you don't blend the grain as much. The smaller millet or wbs grain doesn't quite get pulverized as much so the grain itself isn't as exposed. In addition, I believe that the drill bit blender wasn't as powerful as my oster is. So it did not break up the grain as much as it would have had I used the oster blender. I think using the hand drill on the oster wide mouth blade attachment is ideal for this method.
Quote:
THAI LIPA YAI: WBS 1 QUART GRAIN SLURRY/ 4 QUART REGULAR SPAWN TRIAL #2:
CASED SUBSTRATE
Substrate Ratio Per Tub:2 Tubs Tested
1:2 Ratio Spawn:substrate
- 4 Quarts of WBS grain/ 1 Quart slurry spawn
- 10 Quarts Volume: 1 Brick Coir/ 1 Quarts Verm/ 1 cup strawnet/ 1 cup gypsum/ 1/4 cup supercake formula
- 3" Sub Depth
- 5 Quarts Water
TUB 1 YIELD: TOTAL 370g x 13.2oz
1st: 209g
2nd: 109g
3rd: 52g
TUB 2 YIELD: TOTAL 436g 15.5 oz
1st: 236g
2nd: 116g
34d: 84g
Tub 1 and 2:
TUB 1:
       
2nd flush:
 
3rd flush:
 
TUB 2:
        
2nd flush:
 
3rd flush:
   
FULL PROCEDURE:
1. Pressure cooked 1 pint of water in a regular mouth quart jar with the blender lid on the jar.

2. Setup my spawn area. Setup my bulk subs and tubs. Setup my blender and grain jars. Cleaned the work area prior. Turned off the AC 30 mins prior. Also got a spoon from the door and wiped it down with alc.

3. Took my colonized quart jar and spooned it open air into the jar. I blended the jar for 30 seconds so that the grain would settle and I could place the rest of the half quart of grain inside the blender jar.
 
4. Blended the jar for 30 more seconds. The full quart fit into a half quart of water volume all by eye.
 
5. poured it into my subs.

6. Then spawned 4 quarts regularly and mixed it all up nice and fluffy with gloves on. Making sure to try and touch every part of your slurry with every part of the substrate.

Edited by eatyualive (07/19/15 01:07 PM)
|

 Threaded
 Previous
 Index
Index Next
Next


 Some of these posts are very old and might contain outdated information. You may wish to search for newer posts instead.
 eatyualive


 Civ
Civ 


 Edit
Edit  Reply
Reply 






 mrdasani
 lumpus
 Myco-420
 1 2 all )
 Openminded
 Rohypnol