Ghia's FaP (Fog and Purge) Tank Experiment #1Pan cyan "Estero" test growHello everyone! Yes, I'm still alive... Yes, I'm still an asshole... No, I didn't get arrested or anything. I just got so fed up with the seasonal weather pattern changes and my outdoor beds failing to fruit every year that the love for anything mycology left me for a long time. But I've been feeling the itch a bit this year, and I ended up with with around a full cubic yard of composted manure left from this 5-yard pile I got for the garden this year.

So I decided to finally try to grow Pans seriously for the first time. But, as anyone here who knows me can attest to, I don't do things lightly. "Go big, or go work!" I always used to say... Well, I guess now I'm going to try my version of "small" and efficient. Since I got rid of my automated Martha years ago, and don't really have space for one now, I decided to go with a dual automated mono-tub system set up on an old 40 gallon fish tank stand I had sitting around unused. I am currently attempting to dial in the humidistat and variable power supply so that I can keep the humidity high enough without depositing too much moisture into the substrate trays.
 System BuildMaterials
2x
53 quart totes from Menards for the fruiting chambers
12x
1.9 quart totes from Menards for substrate trays, 3 for each tote and 6 for culture rotations
1x
Humidistat from Amazon to control the fog and FAE
1x
UV light from Amazon to help keep the fogger bucket water clean from bacteria and algae
1x
fogger bucket kit from Amazon (see notes below)
3x
1" female slip to 1" male thread pvc adaptors
2x 1" slip pvc elbows
1x 1" pvc Tee
2x 1" pvc pipe, cut to 10.5" lengths
2x 1" pvc pipe, cut to 1.5" lengths
1x 3 gallon black bucket with lid
Most people are aware of this, but for those who are not... The best way to cut holes in your totes is to use a hole saw drill bit (without the pilot bit), and heat it up with a propane torch hot enough that you can melt the hole in the plastic. For this build I used a 1.25" hole saw bit, held by a pair of pliers. I personally like to twist the bit slightly as it's melting through the plastic. If you carefully thread the male side of the 1" slip to thread pvc adaptor into the hole while it's still warm, it will cut threads into the plastic so it seals better.
 Notes on fogger bucket kit from Amazon
I found this kit while looking for a new ultrasonic fogger and loved the concept of it since it's perfect for our uses. But there are some design flaws. The main one is that inner diameter of the bulkhead that came with it is way too small for the size of the fan that came in the kit. I got around this by using another one of the 1" slip to thread adaptors, threaded from the inside of the lid. The flexible tube that came with the kit has a rubber boot on that end, so it fits nicely over the threads.

But unfortunately, the other end of the flexible tube is a metric size, and did not fit well into the female socket of the 1" pvc Tee. To shim it, I found a pill bottle that the end of the tube fit snuggly into, which tightened up the fit into the Tee enough that it doesn't fall out..

Another design flaw is the kit comes with a single variable voltage controller that controls both the fan speed and single disc ultrasonic fogger. It would dial in better if there were two separate controllers, or just one for the fan and a separate standard power pack for the fogger. Also, the plastic holder for the floating raft was too tight around the fogger unit, and the slit down the side of it was not large enough to let enough water into the fogger unit fast enough to replace that which got turned into fog. Luckily I had a different raft from an old fogger that died, but the one with the kit should work fine enough with some modification. After swapping out the raft, and opening up the exhaust port, this system puts out a surprising amount of fog for as small as it is. Enough so that I have to run the controller at 1/3 power so that it doesn't completely fill the totes THICK with fog. I have no doubt this thing could work just as well with 4 or even 6 totes this size, and would definitely fog a Martha well.
Culture Test GrowI decided to go with a spore syringe of Pan cyan "Estero" spores because Estero, FL is in the county I was born in, and I spent a couple years down the road in San Carlos Park growing up. After my 4oz master jars colonized, I used the fastest jar to spawn 7 quarts (half full) of RGS after noc'ing 7 agar jars with colonized grains. I'm getting ready to sterilize 7 full quart jars of substrate (50% coir, 30% verm, 20% sifted composted manure) tonight for my first test mix. The goal is to spawn 1 pint of grain to 1 quart of substrate for each 1.8 quart tray, leaving plenty of room for casing it later. I'll update below as things progress. Wish me luck!
Update #1I don't think I've ever thought to ask before, but does anyone else wobble-spin their jars like a top while spraying with Iso?


Anyways... Back to the update. On the left is the Pan culture on RGS, on the right is the sterilized substrate. I saved one jar of RGS to G2G with the next batch, and one substrate jar as a control specimen if the trays contaminate. If the trays contam and the jar doesn't, I know the problem wasn't the substrate.

Since the trays are so small, I had to spawn them in two stages to get it thoroughly mixed. I dumped half the jar of sub in, then half the jar of spawn, mixed it well, and packed it with the fork. Then I dumped the rest of the spawn into the jar with the sub, mixed, dumped, and compacted. I forgot to take a pic of the second stage, but y'all get it. After all trays were spawned, I tossed them into a bigger sealed tote to colonize like the "white colonizers" they are.


 Update #2
Round 2 started by G2G'ing my last RGS jar to 7 pint jars of wheat berries. The 'tisms in me really enjoys the pint jar of spawn to quart jar of substrate per tray ratio... Round 1 is doing well, having already colonized around 70-80% in just 3 days. No sign of trich yet, so hopefully it'll stay that way.


 Update #3Notes on dialing in the system:
 Something came to mind while doing my "dry run" test (no substrate) of the system over the past few days. The main perception when automating tubs, marthas, or even large 10'x10'x10' fruiting rooms like I had at my old mushroom farm a decade ago, is that we need just enough fresh air to push the humidity into the chamber without drying the chamber too much. As anyone who has fought the troubles of an automated system and successfully dialed it in can attest to, this is a backwards way to think of it. The way to make sure you have proper evaporation at the substrate surface for pinset initiation, while still having a high enough humidity for fruiting, is to view the process as simply making sure you have just enough humidity that the fresh air doesn't dry out the substrate. You don't want a bunch of fog because it will deposit too much water on everything, and will probably flood your substrate. To put it simply... With a mono-tub you're fighting evaporation, but with an automated system you're fighting saturation.
When growing in a traditional mono-tub setup where you spawn your substrate directly into the tote, you need to spray to keep the humidity up so you can slow down the evaporation from the substrate. This is why we can get away with using "field capacity" as a measure of substrate hydration, because that amount of hydration is factoring in evaporation as well as fruit size. When making substrate for an automated ultrasonic system, you want to make it slightly drier than field capacity because you're adding way more water to the system than just spraying a mono-tub a few times a day. This is why it is imperative that you use a humidistat, and a variable voltage control for the ultrasonic. Yes, you can use a
modified timer to get your run-time low enough that a system will work. But you're going to still have widely varying humidity because of ambient humidity of the room you're fruiting chamber is drawing fresh air from. And without the variable controller for the fogger, you're still going to get too much fog and too much saturation. This was a constant battle with my automated martha.
Despite the problem I mentioned above with this fogger bucket kit, I'm finding it much easier to dial in than any of my previous ultrasonic fogger systems. I still wish it had two separate controllers for the fogger and fan. I am currently running the controller at just below 1/3 power according to the segments on the controller. At the next gap lower, the fogger quits working. Because of this I just blacked out lower than that to remind myself. I should mention here that I did calibrate my humidistat sensor by using the "
salt method". I am currently running it so the fogger bucket kicks on at 93.5% and shuts off at 95%. This leaves the smallest amount of condensation in the trays that I have achieved so far without the surfaces drying out completely. The trick is to get you fog as thin as you can by keeping the on/off cycle tight so the fogger never runs too long. The % will spike another +0.7% to +1.0% for a short time after the bucket shuts off at 95%, and drops by another -0.5% to -0.7% for a short time when it kicks back on at 93.5% until the fogger catches up with the fan. What I've found is that when the bucket shuts off, it sucks some of the fog back down the system into the bucket as the fog falls and the bucket vents out to open air through the fan, giving this system a slight ebb and flow reaction. Because of this, I am confident I know how to alter the humidity between the pin formation stage, and the fruiting stage, without adjusting the system settings. At least for the first "proof -of-concept" fruiting attempt... For pin formation, when you need slight evaporation, I will rest the lids right-side-up on the upturned tub latches so that more fresh air can enter the totes as the system back-flushes fog. But during the fruiting stage I will turn down the latches and rest the lid upside-down to reduce the backflow intake, and retain more RH in the totes between cycles. I have no doubt that this system will provide enough FAE for Pans, or any other species.


 Update #4
Since I had the day off from work, I decided to whip up some casing material since the fruiting trays will be ready to birth before this weekend. For those of you who don't yet know how to figure out what percentage your "dry" material is hydrated, here's how. I took 1 level tbsp of verm and mixed it with 1 level tbsp of peat in a small microwavable container, and weighted it. I then microwaved it in 10-15 second cycles, weighing it again in between each cycle. You do this until it quits loosing weight, then divide that by the original weight. Starting off it weighed 4g, and ended up at 3g, so that means my 50/50 mix by volume is 75% dry material, at 25% hydrated. I plugged my volume requirement (50.625 cubic inches for six tray's casing at 9"x5"x3/16" thick), and "dry" hydration rate into SkyNet to give me a recipe based on volume, including how much lime I need to finish at 8-8.5pH. I then weighed out those volumes of each individual ingredients, and asked SkyNet to convert the volume recipe into weights. I do tend to round numbers to the nearest whole number, so I ended up with these numbers for the first test batch recipe:
60g verm, 90g peat, 5g of lime, and 135g of boiling water.I poured a tiny bit too much water in, so I ended up with 296g of mixed casing, but it evaporated 4g by the time I loaded it into two pint jars for a hot-water bath pasteurization in my crockpot. I let the internal temp of the casing get up to 142F before I set the 90 minute timer and kept it at 155F-ish for 90 minutes. What you see in the pics below is also how I cool my agar dishes after PC'ing, and how I insulate my grains during soak. The first layer is a doubled-up sheet of foiled bubble wrap, and the second layer is a thick padded "moving blanket" quadrupled up, all sinched down on the sides by a belt. This will usually keep the outside temp of whatever container still hot to touch after 8-9 hours. I'll take the temp of the water in the morning to see how much it cooled off after that long.


 Update #5
So the temp of the water after 10.5 hours of sitting under the insulation was still 96F.
I decided to go ahead and slap the casing layer on and birth them today (8/19/26). 5 of the trays looked great, but I think 1 of them has some spiderweb mold. I'll watch it for the next couple days and pull it if it is. I made too much casing material and had around 1.25 cups (101g) left. But it sprinkled on so nicely with it being a bit drier than field capacity that I didn't need the fork to spread it. Now that I know how much casing I need to dust 6 trays, my next batch of casing will be:
60g Peat, 40g Verm, 3.5g H-Lime, and 95g boiling water.


 Update #6
The contam thankfully showed itself within 36 hours after casing and birthing, so I was able to slap the cover on and remove it before it sporulated. I saved it back with the lid on to see which contam it was, and it turns out it was trich, not spiderweb.


 Update #7
So this is the part where I humble myself over learning to fruit Pans, and my confusing system conditions. Starting off testing the system it seemed to stay pretty stable, but after throwing in the substrate trays the system started doing some weird shit. From around 11am-sunset, the system stays high humidity, but dries out the inside of the tubs. Then from sunset-midnight, the RH would drop and the fogger bucket would start kicking on and of like it should. Then from midnight-sunrise, the RH would spike all on it's own to 99-100%, and from sunrise-11am the system just sits there with high RH and condensation not doing anything.
The reason for this is pretty clear IMO. The system is on a porch that gets sun from 11am-sunset, and even with my bamboo shades some solar radiation does still get in through them. Also, this is Indiana... The weather is stupid, so now I'm having temp swings from day to night as well as the outside humidity bottoming out because we finally got a week without rain for once this year...

Because of these wildly swinging temps and humidities, and my reactions to try and balance them out, I've kept the system too wet and now have quite a bit of overlay setting in...

The first two pics were a couple of days (8/19) after birthing, the last two from this morning (8/24).


At this point I would be willing to admit that for most situations, the standard misting process would probably be much easier. But I've never said I like doing shit the easy way when I can overthink things and overcomplicate them just as easily. Plus, I work 12hr shifts from 11am-11pm, and am gone for around 13.5hrs on those days.
The fixes: For the past couple days, and for the next couple, I have disconnected the fogger, plugged the fan into the "Work2" socket of the humidistat so it will help dry out the tubs when the RH spikes, hooked up a thermostat to the heating pads and poured 1/2" of water into the tubs to keep the temps right, and have been misting when the tubs get too dry.

The misting is a temporary step until I get a delivery. I ordered another fan (with controller) for the fogger bucket, and a spare single disc fogger so each component of the bucket will have it's on power source. I will install the second fan stacked on top of the first, and plug it into the Work2 socket with the power pack from the spare fogger. This one will be used to purge humidity when it gets too high. Then the fogger and fogger-fan will both have their own separate controllers plugged into the Work1 socket for fogging when the RH drops too low. Hopefully these fixes will balance out the system for better automation.
Update #8Well, I got the second 80mm fan in the mail, and it died within 2 minutes after installing it. Thankfully I found
Pheno's "Dreamer Tub" thread! After reading through his whole thread, I got some great tips on sensor placement and humidistat settings that have helped to eliminate the microclimate swings. I plugged the fogger bucket fan in so it runs 24/7, so only the ultrasonic is running off the humidistat. I also grabbed some plastic "baskets" to use as platforms to raise the trays up. Now there is 5 inches of space for fog to collect below the rim of the trays while the fogger is running, and the fan then blows it upward around the trays as it purges the fog from below. This has drastically reduced the excess condensation, without drying out the surface of the trays.
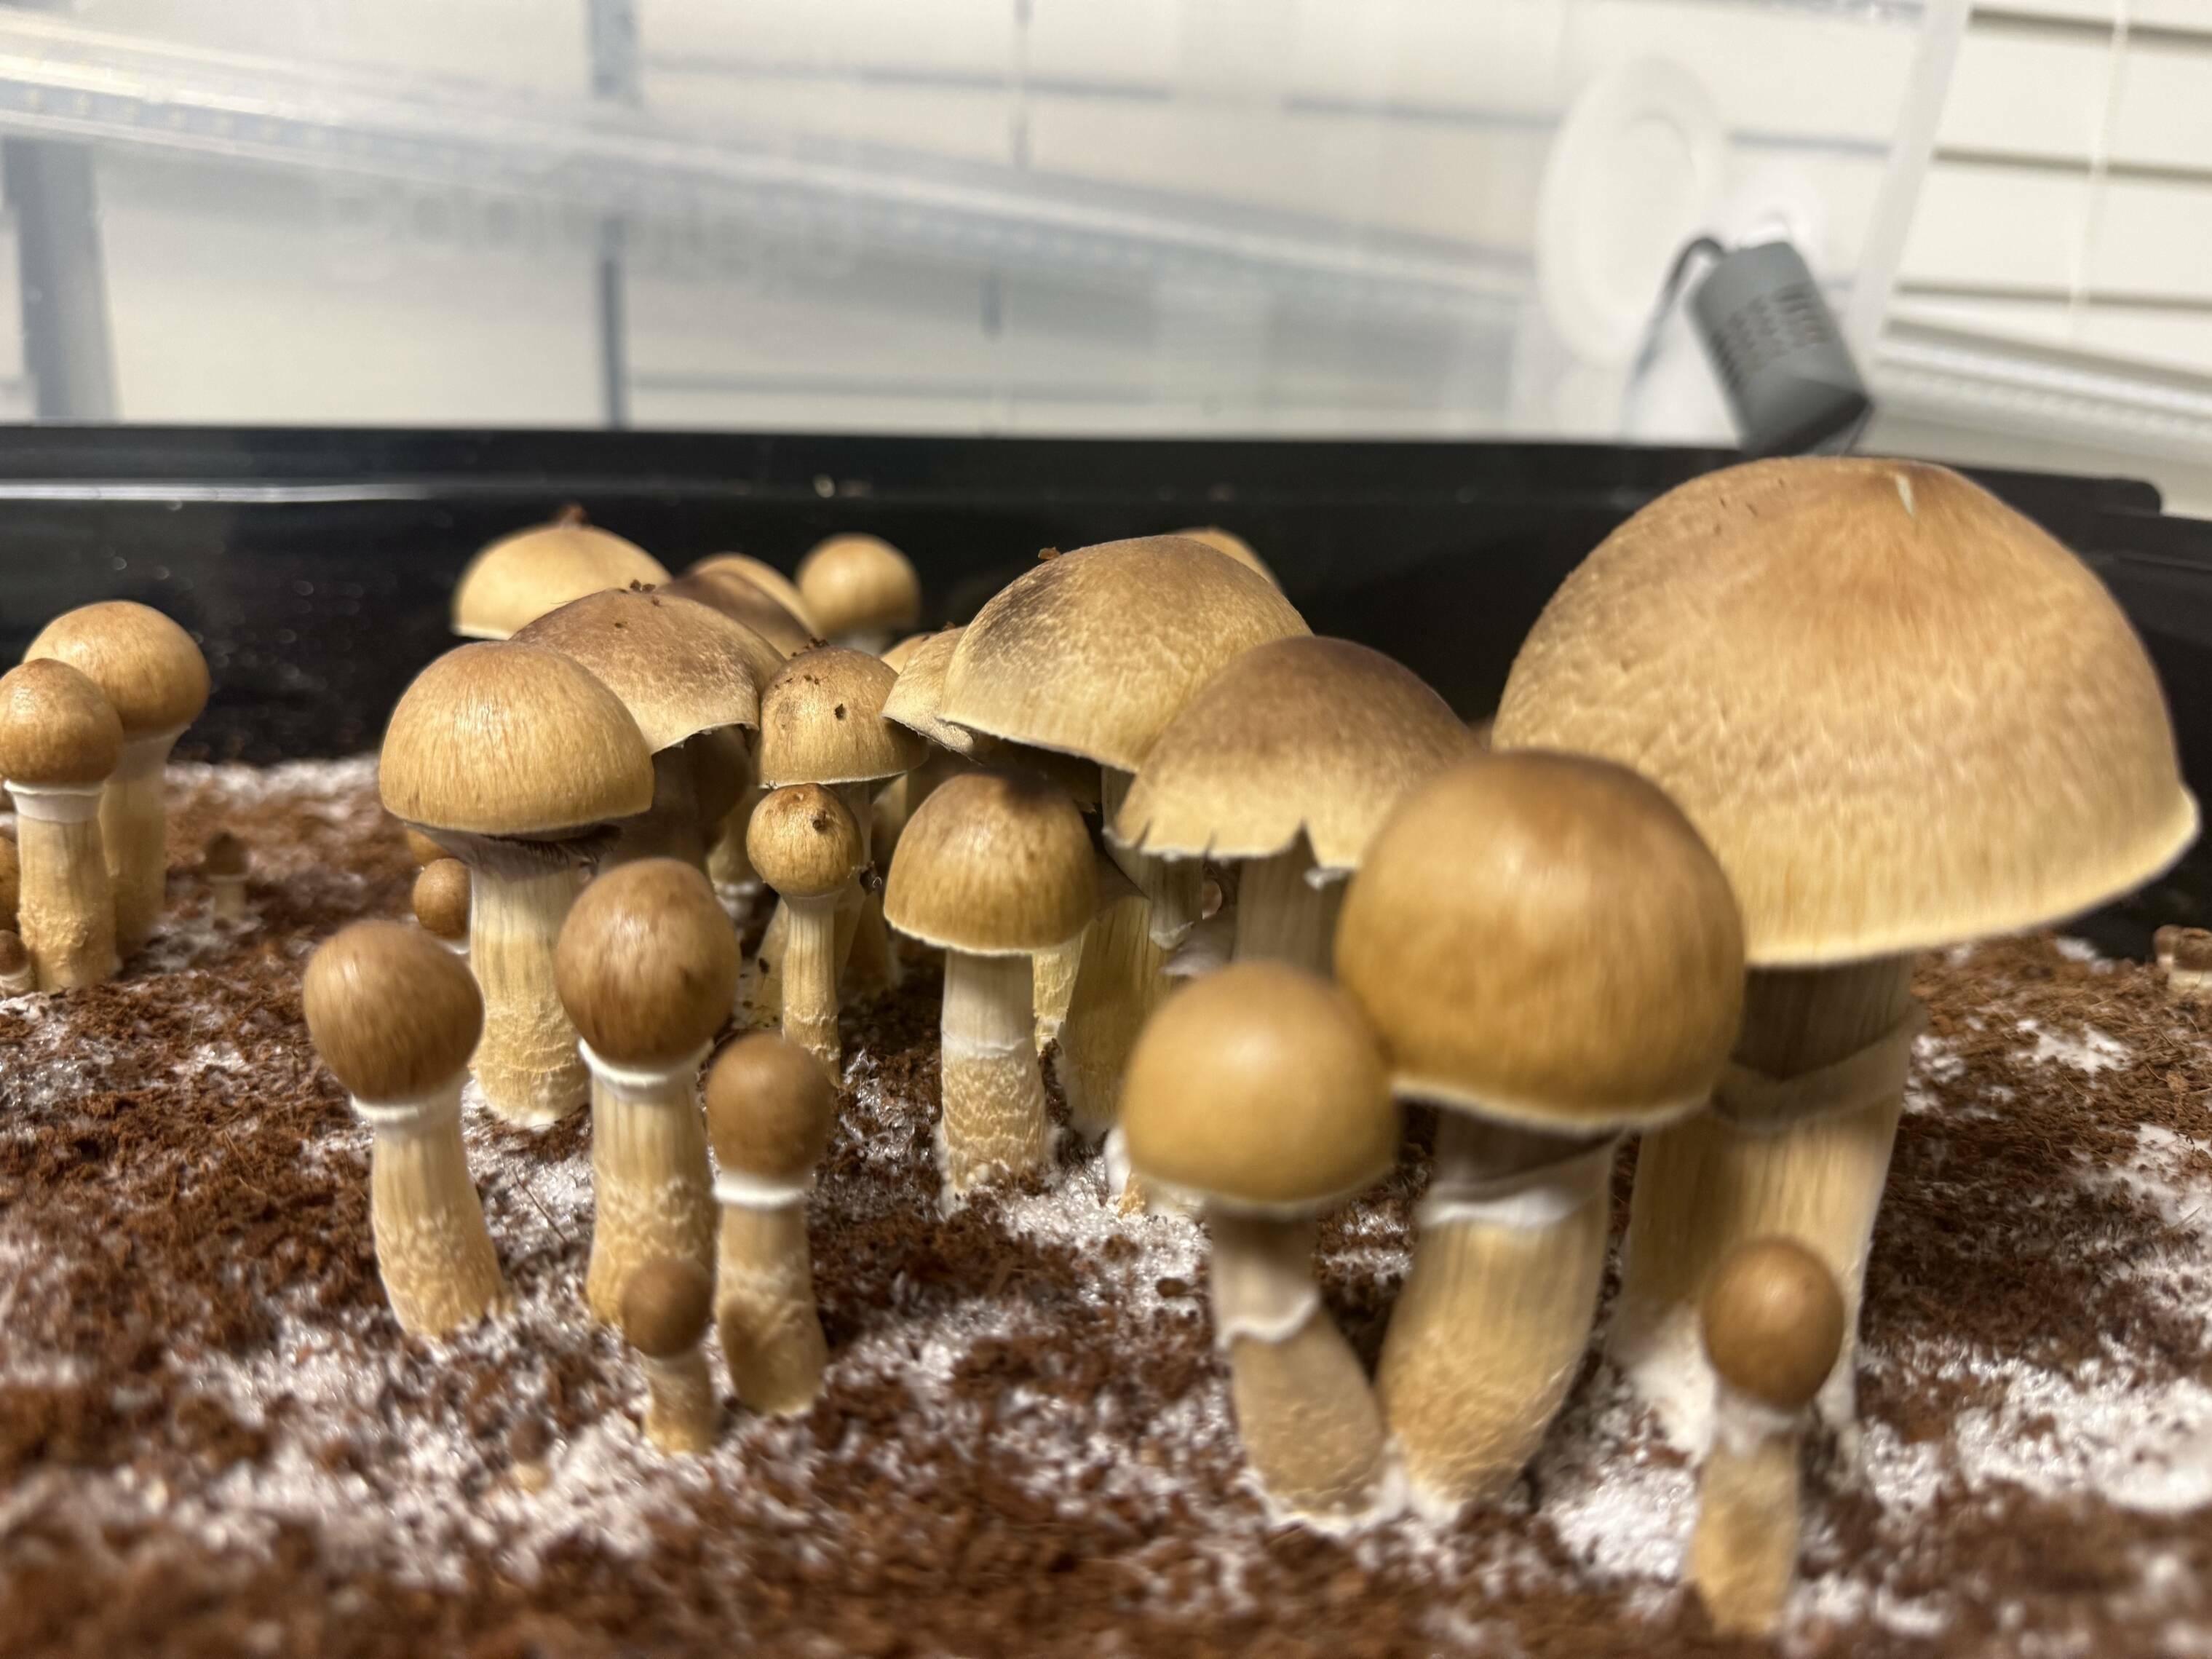
I did alter the fogger bucket by removing the flex hose, and upgraded to 2" pvc to allow more airflow out of the bucket. I moved the whole thing into the main part of my house where the climate is more consistent. I had forked the overlay to see if that helped with pinning, but it just came back thicker. I ended up scraping off the overlay, and re-casing the trays. It's been 2 days running the updated system, and I've got some clean myc coming up. It looks more like fuzzy growth than rubbery, so I'm hopeful it won't overlay on me again.
After reading Pheno's thread I started thinking differently about how to control it. He advised that you kind of ignore trying to overthink the RH controller, and just watch your surface conditions. So after stumbling around trying to find the right settings with this new perspective I landed on basically and ebb and flow style "fog and purge" process that I will forever more call the "FaP Tank" because it sounds naughty! I run the fogger just long enough for the fog to fill up the space below the trays and start spilling over the lips on to the casing layer. When the fogger shuts off, the fan blows fresh air from under the fog to thin it out and push it up to purge it from the tubs. As it thins you can see fresh air tendrils coming up between the trays and through the fog like smoke. This causes the fog to swirls a bit over each of the trays, creating individual microclimates for each tray. It's quite mesmerizing to watch I might add... The surface effects I'm seeing are that while the outside surfaces of the trays and their stands stay dry, the inside lips of the trays and the casing surface stay just moist enough to glisten in the light.
I have the humidistat calibrated to -5% to eliminate the alarm constantly going off, and have the sensor tip below the trays next to the pipe exhaust. I have the controller set to kick on at 85% (90% actual), and shut off at 91% (96% actual), and it spikes to 91.8% (96.8% actual). Currently the cycle is around 45 seconds on to around 8 minutes off, and the casing is still not drying out.


 Update #9
Well, holy shit! Technically I have fruited my first two Pan cyans.... Although they are the smallest non-aborted fully formed mushrooms that I ever fruited!


I noticed them on only one tray, when I was pulling them out to toss outside in the manure pile. I buried the blocks in one spot, and 7 pint jars of grain that had gone too long waiting for the trays to fruit. I pre-sifted a few gallons of the Black Kow I got today, and tossed the larger chunks on top of the failed blocks before burying. I threw a sprinkler hose on the spot and covered it back up with the pool cover I've been using as a tarp.


I don't expect anything to come from the outdoor spawning, but if it does then great! I'll update again with results from the AIO jars, but will start a 2.0 thread for the next batch with Black Kow. I have broken down the system to wash, and will leave it dry until I have new trays to put back in it. I'll be running the 6 half-pint AIO jars in an unmodded tote since there's not enough material to run the system for.


 Threaded
 Previous
 Index
Index Next
Next


 ghiajake


 Agar Wedge


 Edit
Edit  Reply
Reply 






 1 2 3 4 ... 98 99 )
 Pastywhyte

 agar
agar
 ghiajake
 Chills420 version2
 lysergic