
| Home | Mushroom Info | Growing Mushrooms | Archive | General Cultivation | Spore Prints and Syringes | Making clean spore prints |

This site includes paid links. Please support our sponsors.
Making clean spore prints
andymc's step-by-step pictorial guide to getting it right
I've been complimented on my prints, and I do things just a little bit differently than the other teks I've read on the Shroomery, so I thought I'd write up my technique. Thanks very much to RogerRabbit for looking it over.
There's no big innovation here - most of this is stolen straight from other peoples' teks. The reasoning is that I like to use a method like this one for making spore syringes (summary: drop foil print into ziploc baggie, inject water from blanks, suck spore water back out of the baggie) but I found the other printing teks mildly unsatisfying from the standpoint of sterility; I want to make sure that the piece of foil I drop into my baggie, and anything that touches it, stays sterile. With the other teks I tried, I found that difficult to do - particularly when printing larger caps. I use my glovebox quite a lot, so I can't just leave everything in there while the spores drop.
I've documented my entire procedure, including simple stuff found elsewhere, just so this can be a complete step-by-step.
First step is to cut squares of foil and sterilize them. Obtain a nice big jar, such as a pickle/gherkin jar, and clean off the label. You'll also need scissors and some good foil (the extra thick or "heavy duty" stuff if you can get it). I use Waitrose extra thick (UK). Clean up your workspace with Lysol or Oust, and wear gloves if you prefer to avoid getting fingerprints and other hand ickies on the foil.
We are going to need 2 squares of foil for each print. Make them nice and large; I cut off a strip 8-10 cm wide, and then cut that into 4 equal rectangles. Put them into the jar. I make a lot of prints, so I like to cut at least 20-40 squares at a time.


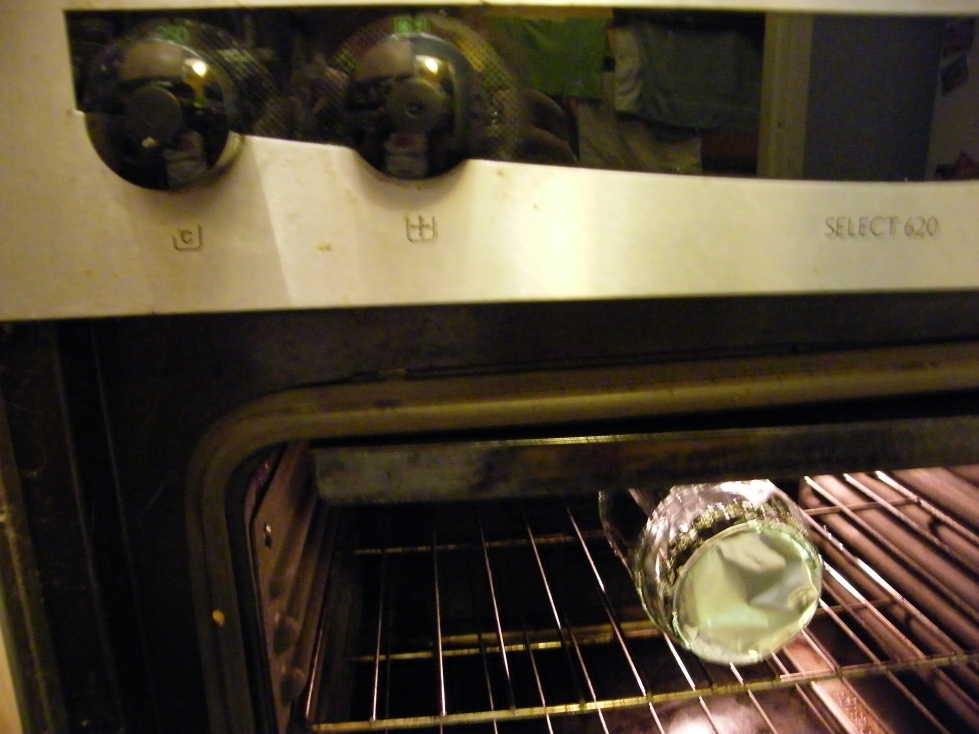
Now we need a lid for our jar, but we don't want to use the original one because it will have sealing material that will char and melt and make a mess. Cut another strip of foil, fold it in half, and fashion a foil lid for the jar as shown. Then preheat your oven to 250c and bake your jar for an hour to sterilize your foil (with the oven door closed of course)


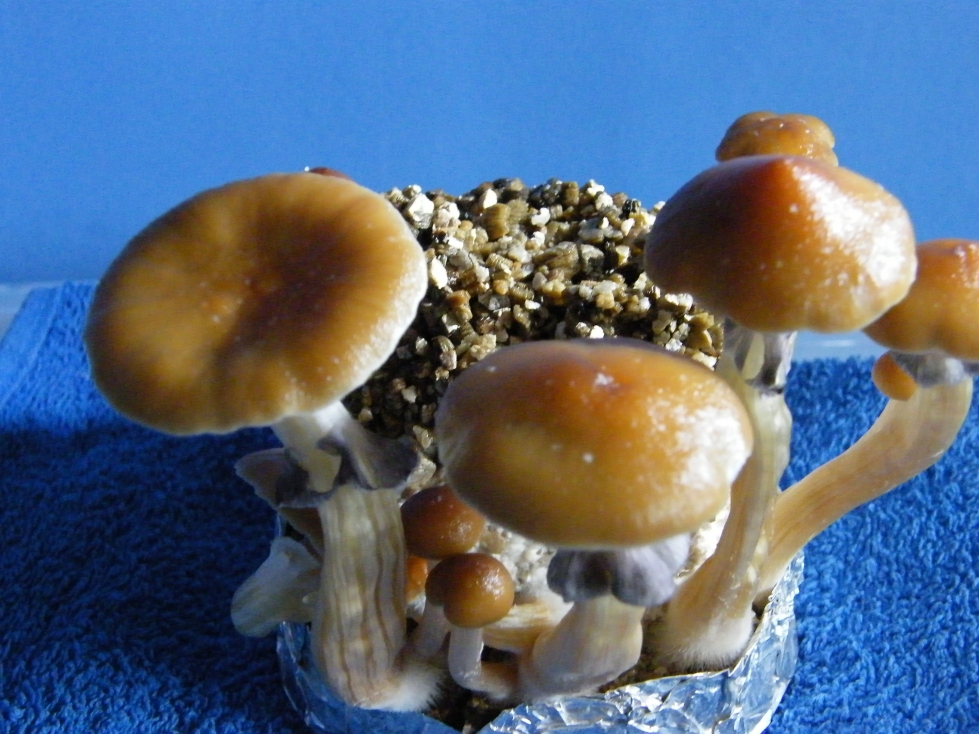
Next we select the caps to print. I like these three from this cake

After your jar of foil squares has cooled (when it's cool enough to hold, it's cool enough) collect materials appropriate for the number of prints you'll be making. You'll need a small, portable hard surface for each cap to rest on. I like to use slimline CD jewel cases. You'll also need something to cover the caps while printing. I use petri dishes for most caps, but some caps are too tall so I use drinking glasses for those. In this case, one of those 3 caps I selected looks too tall for a petri. You'll also need some paper towel, a scalpel or knife to cut the cap from the stem, and some alcohol/wipes to clean it. Here's everything assembled and ready to go.

Wrap the jewel cases in squares of paper towel as shown, and load everything into your glovebox. My glovebox is really just a "still air box" constructed from a plastic tote and some tupperware food containers (Dremels are awesome). Give everything a spray with Oust and attach the lid. Wait a few minutes to let the Oust work its deadly magic.


Disinfect your gloves with alcohol gel and go into the glovebox to remove the foil lid from your pickle jar. Remove foil squares one by one and put them on your jewel cases, shiny side up, covering each one with a petri dish as you go. I like using the petris because you can stack them like this. When finished, put the foil lid back on your pickle jar.


Disinfect your scalpel with alcohol/wipes and cut the mushroom cap from its stem. Try to leave as little stem as possible attached to the cap (ideally, we want to cap to sit flat on the foil). Hold each cap by its edges and carry it into your glovebox through the hand holes. Lift a petri, place the cap on the foil, and re-cover with the petri. If you have a 'proper' glovebox with no holes, you'd have to get the caps into the glovebox before closing it. The point is that the sterile foil is never exposed to the open air, and is uncovered only momentarily whilst you place the cap on it.


You can now open your glovebox and move your stacks of printing caps somewhere safe, like a high shelf where no kids, girlfriends, or dogs can disturb them. Some people say to let spores drop for 24 hours, but I've found that 24 hours can lead to disappointingly light prints. 36 hours never disappoints, in my experience. As you can see, that one cap was indeed too tall for a petri, so I used the drinking glass after all.

After 36 hours, move everything back into your glovebox, along with an unfolded paperclip and some alcohol/wipes with which to disinfect it. Give everything inside the glovebox a spray with Oust, attach the lid, and wait a few minutes. Don your gloves and disinfect them with alcohol gel. One by one, remove petris and carefully poke the paperclip into the caps, just enough to lift them straight off the foil. Don't slide the cap around on the foil, and don't puncture the foil with the paperclip. Re-cover each print with its petri as soon as you've lifted the cap. The caps can now join their friends in the dehydrator (they're still good to use). When finished, open your glovebox and put your prints somewhere where they can dry for 24 hours. I put them into my desiccant chamber.


After 24 hours, we're ready for the last step. Assemble the materials you'll need, which include your prints, your pickle jar of foil squares, scissors for cutting foil, a straight edge (I use this knife, but a small ruler would probably be better), some alcohol/wipes to clean everything, some ziploc baggies for your finished prints, and a sharpie or other marker to label them. Put everything into the glovebox, give it all a spray with some Oust, attach the lid, and wait a few minutes.


Don your gloves and disinfect them with alcohol gel. Go into the glovebox and remove petris one by one from your prints. For each print, cut away the excess foil so that you're left with just a small, relatively sterile square of foil. Disinfect your scissors and straight edge with the alcohol/wipes.


Remove the foil lid from your pickle jar and remove a square of foil. Hold it shiny side up. Place your straight edge along one side, perhaps 5mm from the edge, and crease it upwards.


Take your sqare of printed foil, and place it face-down (print down) on the second square, with one side tucked inside the crease. Now fold the crease down tightly over the print to hold it in place. Holding the folded down side, cut away the excess foil from the bigger piece of foil, so that approximately 5mm remains on each of the 3 sides.


Take your straight edge and use it to crease/fold the remaining 3 sides upwards over the smaller (printed) piece of foil, like so:


Finally, use your marker to label the larger piece of foil (on the side with no folds showing - the piece that doesn't have the print on it). Seal it inside a ziploc baggie and you're finished.


Don't forget to donate some of your prints to the FSRE (Free Spore Ring Earth - http://www.fsre.nl) so that everyone from around the World can continue to exchange free, high quality prints. Their address is:
FSRE
Postbus 2372
5600 CJ EINDHOVEN
The Netherlands
Happy printing
-andymc
There's no big innovation here - most of this is stolen straight from other peoples' teks. The reasoning is that I like to use a method like this one for making spore syringes (summary: drop foil print into ziploc baggie, inject water from blanks, suck spore water back out of the baggie) but I found the other printing teks mildly unsatisfying from the standpoint of sterility; I want to make sure that the piece of foil I drop into my baggie, and anything that touches it, stays sterile. With the other teks I tried, I found that difficult to do - particularly when printing larger caps. I use my glovebox quite a lot, so I can't just leave everything in there while the spores drop.
I've documented my entire procedure, including simple stuff found elsewhere, just so this can be a complete step-by-step.
First step is to cut squares of foil and sterilize them. Obtain a nice big jar, such as a pickle/gherkin jar, and clean off the label. You'll also need scissors and some good foil (the extra thick or "heavy duty" stuff if you can get it). I use Waitrose extra thick (UK). Clean up your workspace with Lysol or Oust, and wear gloves if you prefer to avoid getting fingerprints and other hand ickies on the foil.
We are going to need 2 squares of foil for each print. Make them nice and large; I cut off a strip 8-10 cm wide, and then cut that into 4 equal rectangles. Put them into the jar. I make a lot of prints, so I like to cut at least 20-40 squares at a time.


Now we need a lid for our jar, but we don't want to use the original one because it will have sealing material that will char and melt and make a mess. Cut another strip of foil, fold it in half, and fashion a foil lid for the jar as shown. Then preheat your oven to 250c and bake your jar for an hour to sterilize your foil (with the oven door closed of course)


Next we select the caps to print. I like these three from this cake
After your jar of foil squares has cooled (when it's cool enough to hold, it's cool enough) collect materials appropriate for the number of prints you'll be making. You'll need a small, portable hard surface for each cap to rest on. I like to use slimline CD jewel cases. You'll also need something to cover the caps while printing. I use petri dishes for most caps, but some caps are too tall so I use drinking glasses for those. In this case, one of those 3 caps I selected looks too tall for a petri. You'll also need some paper towel, a scalpel or knife to cut the cap from the stem, and some alcohol/wipes to clean it. Here's everything assembled and ready to go.

Wrap the jewel cases in squares of paper towel as shown, and load everything into your glovebox. My glovebox is really just a "still air box" constructed from a plastic tote and some tupperware food containers (Dremels are awesome). Give everything a spray with Oust and attach the lid. Wait a few minutes to let the Oust work its deadly magic.


Disinfect your gloves with alcohol gel and go into the glovebox to remove the foil lid from your pickle jar. Remove foil squares one by one and put them on your jewel cases, shiny side up, covering each one with a petri dish as you go. I like using the petris because you can stack them like this. When finished, put the foil lid back on your pickle jar.


Disinfect your scalpel with alcohol/wipes and cut the mushroom cap from its stem. Try to leave as little stem as possible attached to the cap (ideally, we want to cap to sit flat on the foil). Hold each cap by its edges and carry it into your glovebox through the hand holes. Lift a petri, place the cap on the foil, and re-cover with the petri. If you have a 'proper' glovebox with no holes, you'd have to get the caps into the glovebox before closing it. The point is that the sterile foil is never exposed to the open air, and is uncovered only momentarily whilst you place the cap on it.


You can now open your glovebox and move your stacks of printing caps somewhere safe, like a high shelf where no kids, girlfriends, or dogs can disturb them. Some people say to let spores drop for 24 hours, but I've found that 24 hours can lead to disappointingly light prints. 36 hours never disappoints, in my experience. As you can see, that one cap was indeed too tall for a petri, so I used the drinking glass after all.

After 36 hours, move everything back into your glovebox, along with an unfolded paperclip and some alcohol/wipes with which to disinfect it. Give everything inside the glovebox a spray with Oust, attach the lid, and wait a few minutes. Don your gloves and disinfect them with alcohol gel. One by one, remove petris and carefully poke the paperclip into the caps, just enough to lift them straight off the foil. Don't slide the cap around on the foil, and don't puncture the foil with the paperclip. Re-cover each print with its petri as soon as you've lifted the cap. The caps can now join their friends in the dehydrator (they're still good to use). When finished, open your glovebox and put your prints somewhere where they can dry for 24 hours. I put them into my desiccant chamber.


After 24 hours, we're ready for the last step. Assemble the materials you'll need, which include your prints, your pickle jar of foil squares, scissors for cutting foil, a straight edge (I use this knife, but a small ruler would probably be better), some alcohol/wipes to clean everything, some ziploc baggies for your finished prints, and a sharpie or other marker to label them. Put everything into the glovebox, give it all a spray with some Oust, attach the lid, and wait a few minutes.


Don your gloves and disinfect them with alcohol gel. Go into the glovebox and remove petris one by one from your prints. For each print, cut away the excess foil so that you're left with just a small, relatively sterile square of foil. Disinfect your scissors and straight edge with the alcohol/wipes.


Remove the foil lid from your pickle jar and remove a square of foil. Hold it shiny side up. Place your straight edge along one side, perhaps 5mm from the edge, and crease it upwards.


Take your sqare of printed foil, and place it face-down (print down) on the second square, with one side tucked inside the crease. Now fold the crease down tightly over the print to hold it in place. Holding the folded down side, cut away the excess foil from the bigger piece of foil, so that approximately 5mm remains on each of the 3 sides.


Take your straight edge and use it to crease/fold the remaining 3 sides upwards over the smaller (printed) piece of foil, like so:


Finally, use your marker to label the larger piece of foil (on the side with no folds showing - the piece that doesn't have the print on it). Seal it inside a ziploc baggie and you're finished.


Don't forget to donate some of your prints to the FSRE (Free Spore Ring Earth - http://www.fsre.nl) so that everyone from around the World can continue to exchange free, high quality prints. Their address is:
FSRE
Postbus 2372
5600 CJ EINDHOVEN
The Netherlands
Happy printing
-andymc
Shop:  Injection Grain Bag
  Red Vein Kratom
  Maeng Da Thai Kratom Leaf Powder
  Buy Kratom Extract
  Liquid Cultures
  Isolated Cubensis Liquid Culture For Sale
